LED PCB Dielectric Thickness: 3 Steps to Choose

On This Page
LED PCB Dielectric Thickness: 3 Steps to Choose
Choose LED PCB dielectric thickness in this order: voltage, heat, then cost.
That is the safest starting point.
For many standard LED aluminum PCBs, 75-100 μm is practical.
But high-power or higher-voltage boards may need a different stackup.
The method below starts with voltage, then checks heat and production cost.
What Is Dielectric Thickness in an Aluminum PCB?
Dielectric thickness is the thickness of the insulating layer between the copper circuit and the aluminum base.
This layer does two jobs at the same time:
- it transfers heat from the LED circuit to the aluminum base
- it provides electrical insulation between copper and aluminum
A thinner dielectric usually helps heat move faster.
A thicker dielectric usually provides more insulation margin.
That is why dielectric thickness is always a balance.
For LED lighting buyers, the key question is not “Which thickness is best?”
The better question is:
Which dielectric thickness is enough for insulation, while still keeping heat transfer, cost, and production stable?
Why Does Dielectric Thickness Matter for LED Lighting?
Dielectric thickness matters because LEDs are sensitive to heat.
If heat cannot move away from the LED efficiently, the LED junction temperature rises.
That can reduce light output, shift color, and shorten service life.
The dielectric layer is one part of that heat path.
A thicker dielectric usually adds more thermal resistance.
A thinner dielectric usually reduces thermal resistance, but it may leave less insulation margin for higher-voltage designs.
This is why LED aluminum PCB selection should not focus on only one number.
You need to check the electrical requirement first.
Then check the thermal requirement.
Then check cost and material availability.
What Is a Common Dielectric Thickness for LED Aluminum PCBs?
For many standard LED lighting projects, 75–100 μm is a common and practical range.
This range is widely used because it gives a reasonable balance between:
- insulation safety
- thermal performance
- material availability
- production stability
- cost control
It is especially practical for many LED lighting products using standard voltage and moderate power.
But it should not be treated as a universal answer.
Some projects need a thinner dielectric.
Some projects need a thicker dielectric.
The right choice depends on the actual working voltage, LED power, lamp structure, and production target.
Does Thinner Dielectric Always Mean Better Heat Dissipation?
In general, thinner dielectric helps reduce thermal resistance.
But that does not mean the thinnest option is always the best choice.
A very thin dielectric may improve heat transfer.
But it can also increase material cost, reduce insulation margin, or require special material procurement.
For low-voltage LED modules or high-power LED designs, a thinner dielectric may be useful.
For standard LED lighting projects, it may not be necessary.
The practical rule is simple:
Use the thinnest dielectric that still meets insulation, reliability, and production requirements.
Do not choose a thin dielectric only because it looks better on a datasheet.
Does Thicker Dielectric Mean Better Safety?
A thicker dielectric usually provides higher breakdown voltage.
So yes, it can improve insulation margin.
But that does not mean thicker is always better.
If your working voltage is already covered by a standard dielectric thickness, going thicker may only add thermal resistance and cost.
For example, a standard LED downlight does not always need a very thick dielectric.
A high-voltage industrial lighting design may need more insulation margin.
The buyer’s job is to match dielectric thickness to the actual voltage class.
Not to choose the thickest option by default.
How to Choose Dielectric Thickness: A Practical 3-Step Method
A practical dielectric thickness decision can be made in three steps.
Start with voltage.
Then check heat.
Then check cost and production reality.
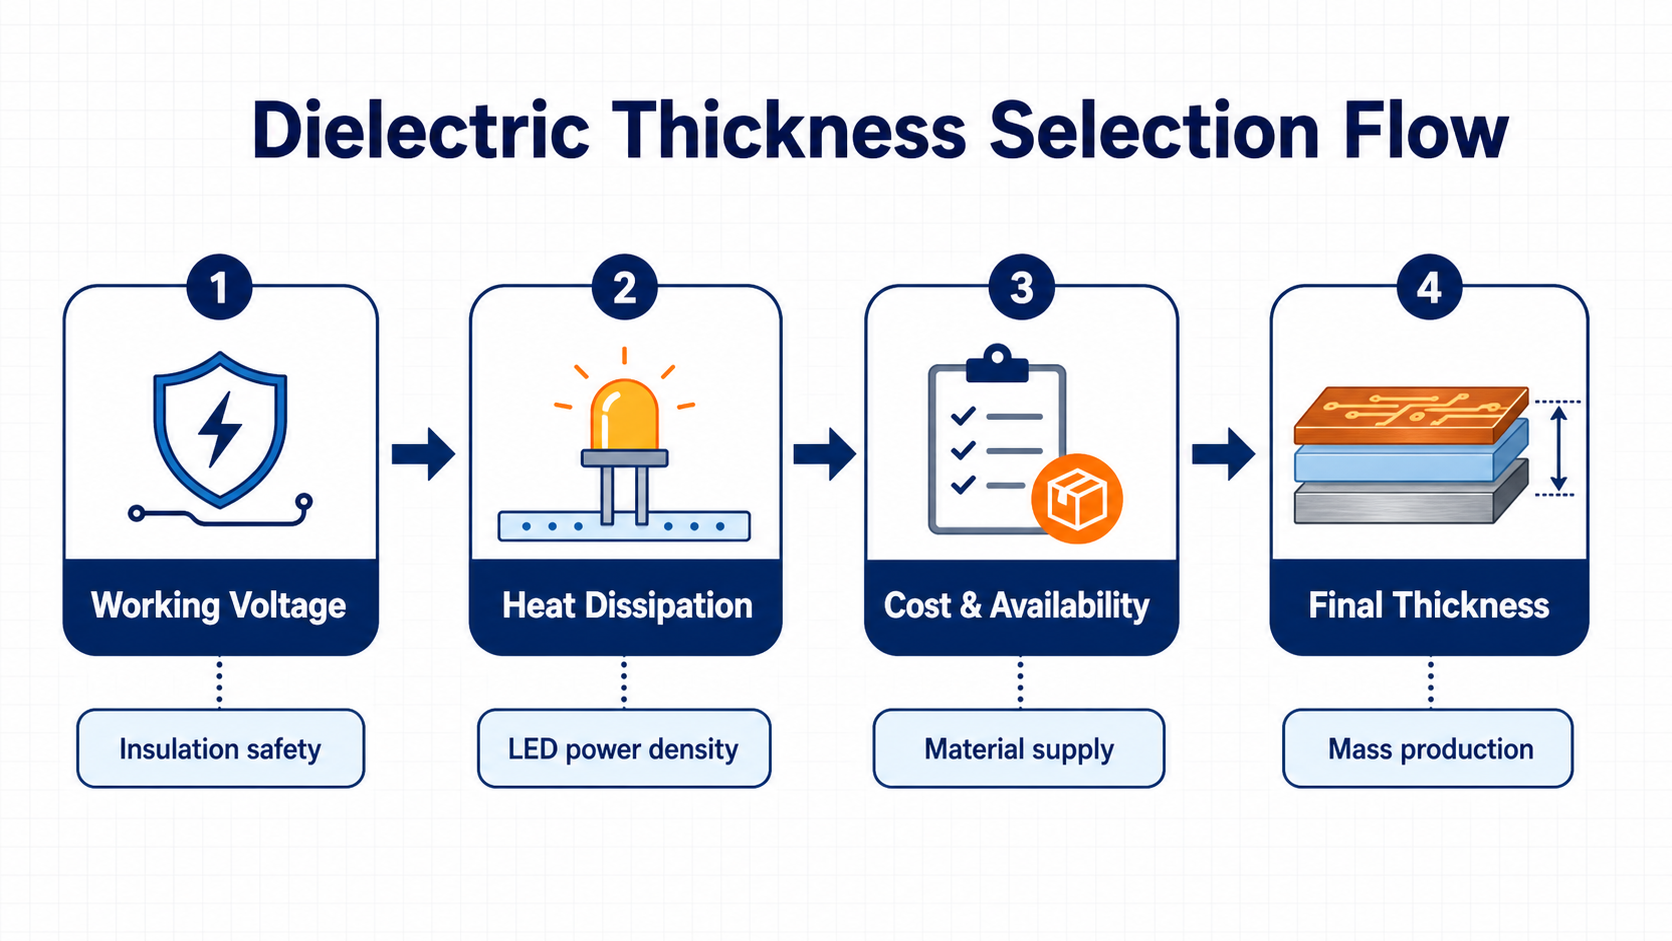
Use voltage, thermal needs, and cost to narrow down the practical dielectric thickness range.
Step 1: Check the Working Voltage First
Working voltage sets the minimum insulation requirement.
This is the first thing buyers should check.
If the dielectric is too thin for the voltage class, the board may fail insulation or Hi-Pot requirements.
For low-voltage LED products, thinner dielectric materials may be acceptable.
For 120–230V AC LED lighting products, standard dielectric thicknesses around 75–100 μm are commonly used.
For higher-voltage or reinforced-insulation designs, thicker dielectric may be needed.
A simple way to think about it:
| Working Voltage Situation | Practical Direction | Buyer Check |
|---|---|---|
| Low-voltage LED module | Thinner dielectric may be possible | Confirm insulation requirement and LED power |
| Standard AC LED lighting | 75–100 μm is often practical | Confirm safety margin and production test needs |
| Higher-voltage lighting | Thicker dielectric may be needed | Confirm voltage class and insulation standard |
| Unclear requirement | Do not guess | Send voltage, power, and application details |
The important point:
Voltage decides the safety floor. Thermal design comes after that.
Step 2: Check the Heat Dissipation Need
After voltage, check the LED power and heat density.
A low-power LED board may not need a very thin dielectric.
A high-power LED board may need better heat transfer.
This can be done in two ways:
- use a thinner dielectric
- use a higher-thermal-conductivity dielectric material
For many standard LED lighting products, the practical choice is not extreme.
A 75–100 μm dielectric with suitable thermal conductivity is often enough for normal production.
But if the LED power is high, the LED density is tight, or the lamp housing has poor heat dissipation, the dielectric choice becomes more important.
In that case, buyers should not only ask for “aluminum PCB.”
They should provide the LED power, board size, lamp structure, and expected working condition.
That makes the quote more accurate.
It also helps avoid using the wrong material for mass production.
Step 3: Check Cost and Production Availability
After voltage and heat are clear, cost becomes the final filter.
Standard dielectric thicknesses are usually easier to source.
They also tend to have more stable production performance.
Special thin or thick dielectric materials may cost more.
They may also need longer material lead time.
For bulk LED lighting orders, this matters.
A material that looks good technically may not be the best choice for repeat production.
For cost-sensitive LED products, a practical standard material is often better than a special material that adds cost without clear benefit.
That is why many LED lighting projects stay in the 75–100 μm range.
It is not always the highest-performance option.
But it is often the most practical option for stable production.
Practical Comparison: Thin, Standard, and Thick Dielectric
Here is a simple way to compare the choices.
| Dielectric Choice | Practical Benefit | Possible Risk | Best Fit |
|---|---|---|---|
| Thin dielectric | Better heat transfer | Less insulation margin; may cost more | Low-voltage or high-power LED designs |
| Standard 75–100 μm | Balanced performance, cost, and availability | Not ideal for every extreme design | Most standard LED lighting projects |
| Thick dielectric | More insulation margin | Higher thermal resistance and cost | Higher-voltage or special safety designs |
| Higher-conductivity material | Improves heat transfer without only reducing thickness | Higher material cost | Higher-power LED products |
The key point is simple.
Do not compare thickness alone.
Compare thickness, thermal conductivity, insulation requirement, and cost together.
Common Mistakes When Choosing Dielectric Thickness
Even experienced buyers can choose the wrong dielectric thickness.
Most mistakes come from focusing on only one factor.
Mistake 1: Choosing the Thickest Dielectric “Just to Be Safe”
Thicker dielectric can improve insulation margin.
But it also increases thermal resistance.
If your project does not need extra insulation margin, a thicker dielectric may only increase cost and reduce heat transfer.
For standard LED lighting products, “safer” does not always mean “thicker.”
It means meeting the required insulation level with a stable and practical material.
Mistake 2: Choosing the Thinnest Dielectric for Heat Dissipation
Thinner dielectric can help heat transfer.
But it must still meet electrical insulation requirements.
If the board is used in a higher-voltage LED lighting product, the thinnest option may not be suitable.
This is why voltage should be checked before thermal optimization.
Heat transfer is important.
But it should not override safety requirements.
Mistake 3: Only Looking at Thermal Conductivity
Thermal conductivity is important.
But it is not the whole story.
A dielectric with higher thermal conductivity can still perform poorly if it is too thick for the design target.
A lower-conductivity material may still be acceptable if the thickness, LED power, and lamp structure are suitable.
Buyers should compare the full stack.
That includes:
- dielectric thickness
- dielectric thermal conductivity
- copper thickness
- board thickness
- lamp housing heat dissipation
- LED power density
Mistake 4: Copying a High-End Specification for a Standard LED Product
Many online examples are written for higher-performance or more demanding designs.
That does not mean every LED lighting product needs those specifications.
For cost-sensitive LED lighting production, over-specifying material can make the board more expensive without improving the final product in a meaningful way.
A practical specification is better than an impressive specification.
Especially for repeat orders.
What Should Buyers Provide Before Quotation?
If you already know the dielectric thickness, include it in your RFQ.
If you are not sure, provide the application details.
A supplier can usually recommend a more practical option when the basic information is clear.
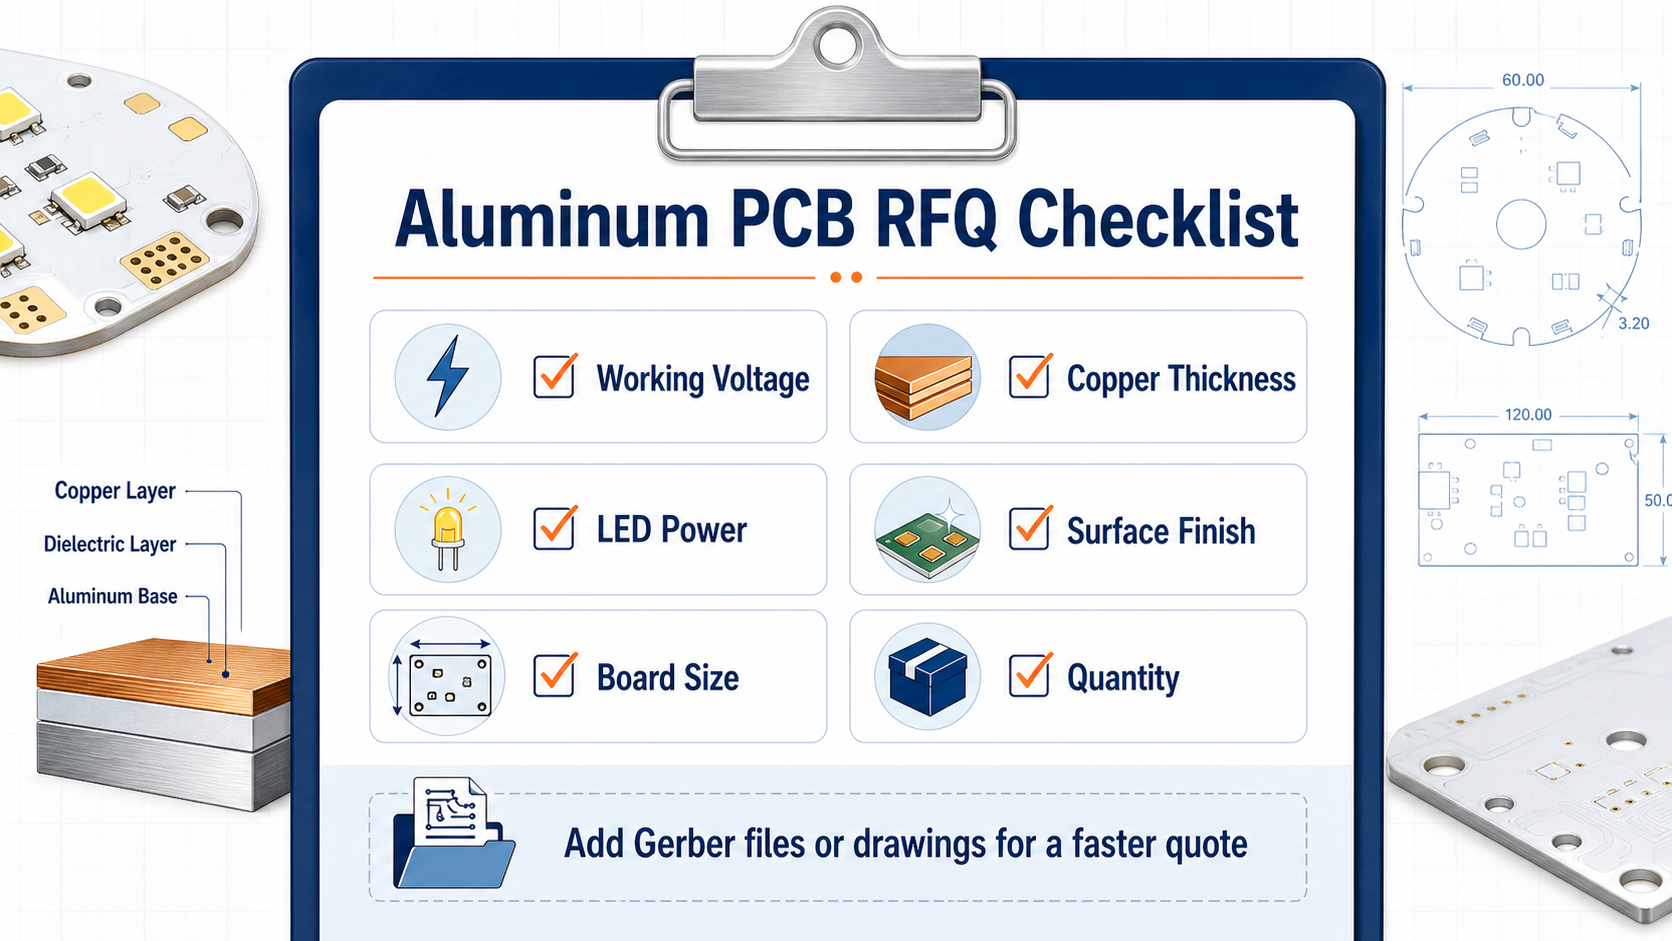
For an accurate quote, buyers should provide:
- board drawing or sample
- board size
- total board thickness
- copper thickness
- dielectric thickness, if already specified
- thermal conductivity requirement, if any
- working voltage
- LED power or power density
- surface finish
- quantity
- application, such as downlight, panel light, street light, or flood light
Here is a simple RFQ example:
Application: 20W LED downlight
Working voltage: 230V AC
Board thickness: 1.0 mm or 1.5 mm
Copper thickness: 12 μm or 25 μm
Dielectric thickness: please recommend standard option
Surface finish: OSP or HASL
Quantity: 5,000 pcs
Drawing: attached
This is usually better than writing only:
Please quote aluminum PCB.
More information leads to a more useful quote.
It also reduces back-and-forth communication.
Providing voltage, power, board size, copper thickness, and quantity helps suppliers recommend a practical dielectric thickness.
When Is a Standard Dielectric Thickness Enough?
A standard dielectric thickness is often enough when the project is a common LED lighting product.
This includes many:
- downlights
- panel lights
- ceiling lights
- strip light modules
- basic commercial lighting boards
For these projects, the main goal is usually stable production and reasonable cost.
The board must meet electrical and thermal requirements.
But it does not always need special high-end material.
In many cases, a practical standard dielectric is enough for mass production.
The better choice is the one that fits the product, not the one that looks strongest on paper.
FAQ
What is the standard dielectric thickness for LED aluminum PCBs?
For many standard LED lighting projects, 75–100 μm is a common and practical dielectric thickness range.
It balances insulation safety, heat transfer, material availability, and cost.
Is thinner dielectric better for LED heat dissipation?
Usually, thinner dielectric helps reduce thermal resistance.
But it is not always the right choice.
The dielectric still needs to meet the required insulation level and production requirements.
Is thicker dielectric safer?
A thicker dielectric usually provides more insulation margin.
But if your working voltage is already covered by a standard thickness, going thicker may only add thermal resistance and cost.
Does dielectric thickness affect PCB price?
Yes.
Standard dielectric thicknesses are usually more cost-effective because materials are easier to source and production is more stable.
Special thin or thick dielectric materials may increase cost and lead time.
How do I know which dielectric thickness my LED board needs?
Start with the working voltage.
Then check LED power and heat dissipation needs.
Finally, check cost, quantity, and material availability.
If you are not sure, send your drawing, voltage, LED power, and target quantity to the supplier for a practical recommendation.
Should I specify dielectric thickness in the RFQ?
If you already know the requirement, yes.
If you are not sure, provide the application details instead.
For example, working voltage, LED power, board size, copper thickness, surface finish, and quantity are often enough for the supplier to recommend a standard option.
Conclusion
Choosing dielectric thickness for LED aluminum PCBs is a balance between insulation, heat transfer, cost, and production stability.
For many standard LED lighting projects, 75–100 μm is a practical starting point.
But the final choice should depend on the working voltage, LED power, lamp structure, and production target.
Do not choose the thinnest dielectric only for heat dissipation.
Do not choose the thickest dielectric only to feel safer.
Choose the thickness that meets insulation requirements first, then keeps thermal performance, cost, and supply stable.
If you are planning an LED lighting project, send us your drawing, working voltage, LED power, board size, copper thickness, surface finish, and target quantity.
We can help check a practical dielectric thickness option before mass production.
Join Our Industrial Community
Get exclusive technical whitepapers and industry news delivered to your inbox every month. No spam, only professional insights.